QT qml의 TextField, Button을 이용한 문구 출력
QML을 이용해 GUI 프로그램을 만들기 위해 프로젝트 생성은 아래 링크를 참고하시면 됩니다.
https://zidarn87.tistory.com/9?category=415008
QT - Widget, Console, Quick 프로젝트 생성하여 Hello world 출력하기
QT - Widget, Console, Quick 프로젝트 생성하여 Hello world 출력하기 1. Qt Widgets Application으로 Hello world 출력하기 Qt Widgets Application을 만들고 계속 Next를 누른다. 프로젝트를 생성하면 아래와..
zidarn87.tistory.com
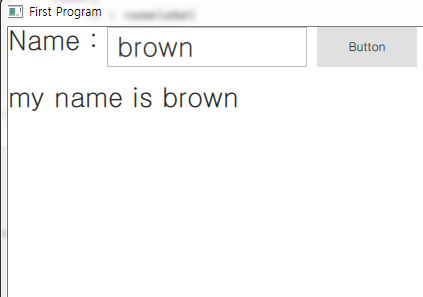
Button을 눌렀을 때 TextField에 입력된 text를 label에 업데이트하는 것을 구현해 봅니다.
Qt의 Cpp 쪽으로 데이터를 보내지 않고, qml에 내에서만 코드를 작성해 볼게요.
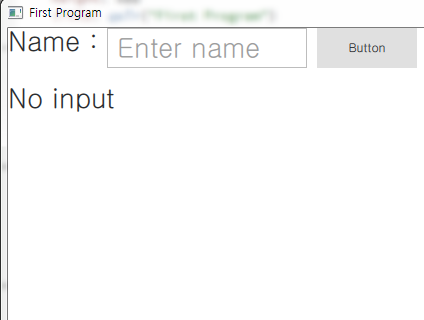
"Name : " 문구를 표시한 Label과 TextField로부터 받아온 문구를 표시할 Label을 생성하였습니다.
displayname Label의 위치는 namelabel의 아래 쪽에 위치하도록 하였습니다.
    Label{
        id : namelabel
        x: parent.x
        font.pointSize: 20
        text : "Name : "
    }

    Label{
        id : displayname
        y: namelabel.height + 30
        font.pointSize: 20
        text : "No input"
    }
text를 입력받을 TextField를 생성하였습니다.
위치는 namelabel의 오른쪽에 위치하도록 하였습니다.
    TextField {
        id:textfield
        x:namelabel.width
        width: 200
        placeholderText: qsTr("Enter name")
        font.pointSize: 20
    }
Buttom 컴포넌트를 생성하였습니다.
위치는 textfield의 오른쪽에 위치하도록 하였고, button을 클릭하였을 때, displayname Label의 문구를 업데이트 하도록 구현하였습니다.
    Button{
        x: textfield.x + textfield.width + 10
        text: "Button"
        onClicked: buttonClickProcess()

        function buttonClickProcess(){
            displayname.text = "my name is " + textfield.text
        }
    }
전체 qml의 코드는 아래와 같습니다.
import QtQuick 2.12
import QtQuick.Window 2.12
import QtQuick.Controls 2.12

Window {
    visible: true
    width: 640
    height: 480
    title: qsTr("First Program")

    Label{
        id : namelabel
        x: parent.x
        font.pointSize: 20
        text : "Name : "
    }

    Label{
        id : displayname
        y: namelabel.height + 30
        font.pointSize: 20
        text : "No input"
    }

    TextField {
        id:textfield
        x:namelabel.width
        width: 200
        placeholderText: qsTr("Enter name")
        font.pointSize: 20
    }

    Button{
        x: textfield.x + textfield.width + 10
        text: "Button"
        onClicked: buttonClickProcess()

        function buttonClickProcess(){
            displayname.text = "my name is " + textfield.text
        }
    }
}
'프로그래밍 > QT_QML' 카테고리의 다른 글
| QT qml의 slider를 이용해 Rectangle 색상 변경하기 (0) | 2020.07.30 |
|---|---|
| QT qml의 popup 표시하고 timer를 이용해 팝업 닫기 (0) | 2020.07.29 |
| QT qml의 listview을 이용하여 간단한 리스트 표시하기 - hightlight 포함 (0) | 2020.07.28 |
| QT - Widget, Console, Quick 프로젝트 생성하여 Hello world 출력하기 (0) | 2020.07.25 |
| QT Creator 설치하기 - 윈도우 용 (0) | 2020.07.23 |