[C++11] shared_ptr 정리 및 간단한 사용 예제
shared_ptr은 C++11부터 사용 가능한 smart pointer입니다.
std::shared_ptr 란
포인터를 통해 객체의 공유 소유권을 유지하는 스마트 포인터입니다. 힙 메모리에 객체를 위한 메모리와 참조 카운터를 위한 메모리가 할당됩니다. 여러 shared_ptr 객체가 동일한 객체를 소유할 수 있습니다. 다음 중 하나가 발생하면 개체가 소멸되고 메모리 할당이 해제됩니다.
- 객체를 소유하고 있는 마지막 남은 shared_ptr이 파괴됩니다.
- 객체를 소유하고 있는 마지막 남은 shared_ptr에는 operator= 또는 reset()을 통해 다른 포인터가 할당됩니다.
- 객체는 생성 중에 shared_ptr에 제공되는 delete-expression 또는 사용자 지정 삭제자를 사용하여 소멸됩니다.
std::shared_ptr 사용법
1. object를 가르키는 shared_ptr 생성자 호출할 수 있습니다. => std::shared_ptr<T> ptr(T *);
2. 새로운 shard_ptr 객체를 생성하기 위해 std::make_shard를 사용할 수 있습니다.
=> std::shared_ptr<T> ptr = std::make_shared<T>();
3. 동일한 포인터를 공유할 수 있습니다. 공유하는 변수가 늘어날수록 참조 카운터가 증가하며, use_count() 함수를 사용하여 참조 카운터를 확인할 수 있습니다. reset() 함수는 nullptr처럼 포인터를 해제하고 참조 카운터를 감소시킵니다.
=> std::shared_ptr<T> ptr1 = std::make_shared<T>();
=> std::shared_ptr<T> ptr2 = ptr2;
#include <iostream>
#include <memory>
class Student
{
public:
Student() { std::cout << __FUNCTION__ << std::endl; }
~Student() { std::cout << __FUNCTION__ << std::endl; }
std::shared_ptr<Student> getPtr()
{
return std::shared_ptr<Student>(this);
}
};
int main()
{
Student* p = new Student;
// 1. p object를 가르키는 shared_ptr 생성자 호출합니다.
std::shared_ptr<Student> ptr1(p);
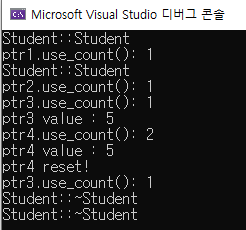
std::cout << "ptr1.use_count(): " << ptr1.use_count() << std::endl;
// 2. 새로운 shard_ptr 객체를 생성하기 위해 std::make_shard를 사용합니다.
// std::make_shard는 객체와 참조 카운터를 위한 메모리를 할당합니다.
std::shared_ptr<Student> ptr2 = std::make_shared<Student>();
std::cout << "ptr2.use_count(): " << ptr2.use_count() << std::endl;
// 3. 동일한 포인터를 공유합니다. (ptr3과 ptr4)
std::shared_ptr<int> ptr3(new int(5));
std::cout << "ptr3.use_count(): " << ptr3.use_count() << std::endl;
std::cout << "ptr3 value : " << *ptr3 << std::endl;
std::shared_ptr<int> ptr4 = ptr3;
std::cout << "ptr4.use_count(): " << ptr4.use_count() << std::endl;
std::cout << "ptr4 value : " << *ptr4 << std::endl;
std::cout << "ptr4 reset! " << std::endl;
ptr4.reset();
std::cout << "ptr3.use_count(): " << ptr3.use_count() << std::endl;
return 0;
}
std::shared_ptr를 사용할 때 주의할 점
개체의 소유권은 다른 shared_ptr에 값을 할당하거나 복사 구성을 통해서만 다른 shared_ptr과 공유할 수 있습니다. 다른 shared_ptr이 소유한 원시 기본 포인터를 사용하여 새 shared_ptr을 구성하면 정의되지 않은 동작이 발생합니다.
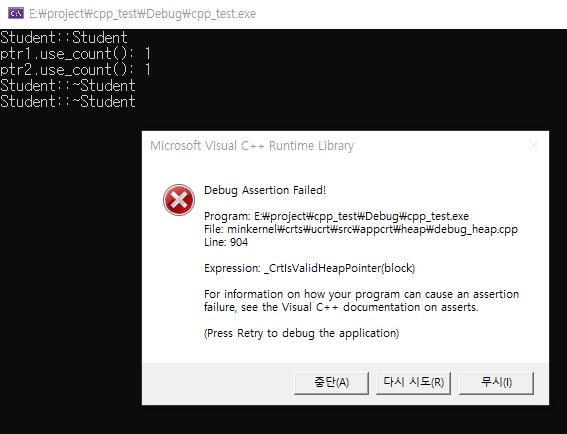
아래 예제는 ptr2에 ptr1에서 객체의 주소를 return 받아 할당하도록 하였는데, 실행파일이 죽게됩니다.
#include <iostream>
#include <memory>

class Student
{
public:
    Student() { std::cout << __FUNCTION__ << std::endl; }
    ~Student() { std::cout << __FUNCTION__ << std::endl; }

    std::shared_ptr<Student> getPtr()
    {
        return std::shared_ptr<Student>(this);
    }
};

int main()
{
    Student* p = new Student;

    //p object를 가르키는 shared_ptr 생성자 호출합니다.
    std::shared_ptr<Student> ptr1(p);
    std::cout << "ptr1.use_count(): " << ptr1.use_count() << std::endl;

    // ptr2에 ptr1에서 객체의 주소를 return 받아 할당하도록 해봅니다.
    std::shared_ptr<Student> ptr2 = ptr1->getPtr(); //
    std::cout << "ptr2.use_count(): " << ptr2.use_count() << std::endl;

    return 0;
}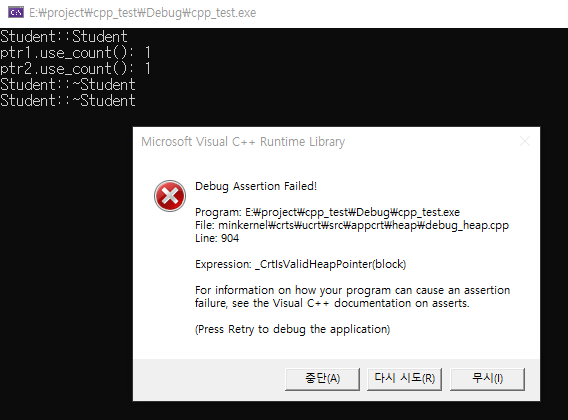
Student라는 클래스를 하나 동적선언하였고, 이 객체를 두 개의 shared_ptr ptr1, ptr2에 할당하였습니다. ptr2를 생성하는 시점에 ptr1에 의해서 이미 Student 객체의 파괴자는 호출되어 객체가 소멸됩니다. 객체가 없는 상태에서 ptr2에서 다시 파괴자를 호출하는 구조이기 때문에 실행파일이 죽게됩니다.
#include <iostream>
#include <memory>

class Student
{
public:
    Student() { std::cout << __FUNCTION__ << std::endl; }
    ~Student() { std::cout << __FUNCTION__ << std::endl; }

    std::shared_ptr<Student> getPtr()
    {
        return std::shared_ptr<Student>(this);
    }
};

int main()
{
    Student* p = new Student;

    //p object를 가르키는 shared_ptr 생성자 호출합니다.
    std::shared_ptr<Student> ptr1(p);
    std::cout << "ptr1.use_count(): " << ptr1.use_count() << std::endl;

    //p object를 가르키는 shared_ptr 생성자 호출합니다.
    std::shared_ptr<Student> ptr2(p);
    std::cout << "ptr2.use_count(): " << ptr2.use_count() << std::endl;

    return 0;
}
참조
https://en.cppreference.com/w/cpp/memory/shared_ptr
std::shared_ptr - cppreference.com
template< class T > class shared_ptr; (since C++11) std::shared_ptr is a smart pointer that retains shared ownership of an object through a pointer. Several shared_ptr objects may own the same object. The object is destroyed and its memory deallocated when
en.cppreference.com
https://en.cppreference.com/w/cpp/memory/unique_ptr
std::unique_ptr - cppreference.com
(1) (since C++11) template < class T, class Deleter > class unique_ptr ; (2) (since C++11) std::unique_ptr is a smart pointer that owns and manages another object through a pointer and disposes of that object when the unique_ptr goes out of sco
en.cppreference.com
'프로그래밍 > c++' 카테고리의 다른 글
| [C++11] std::bind, std::placeholders 간단한 사용법 (0) | 2023.04.04 |
|---|---|
| [C++11] std::thread, join() 간단한 사용법 (함수, 클래스) (0) | 2022.03.12 |