[C++11] std::bind, std::placeholders 사용법
std::bind란?
함수 템플릿 바인드는 함수에 대한 전달 호출 wrapper를 생성합니다. 전달 인자를 설정할 수 있는 함수 포인터라고 보시면 됩니다.
std::bind 사용 방법
template< class F, class... Args >
/*unspecified*/ std::bind( F&& f, Args&&... args );
f - 일부 인수에 바인딩되는 호출 가능한 객체입니다.(함수 객체, 함수에 대한 포인터, 함수에 대한 참조, 멤버 함수에 대한 포인터 또는 데이터 멤버에 대한 포인터)
이
args - 바인드할 전달인자 목록입니다. 바인딩되지 않은 인수는 namespace std::placeholders의 자리 표시자 _1, _2, _3...으로 대체될 수 있습니다.
std::placeholder 이란?
보통 std::bind와 같이 많이 쓰이며, 함수의 인자를 받을 수 있도록 해줍니다.
std::placeholders::_1, std::placeholders::_2, ..., std::placeholders::_N 형식으로 사용됩니다.
std::bind, std::placeholder의 header 파일
#include <functional>
std::bind, std::placeholder의 사용 예제
#include <iostream>
#include <functional>
void add(int n1, int n2) {
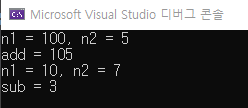
std::cout << "n1 = " << n1 << ", n2 = " << n2 << std::endl;
std::cout << "add = " << n1 + n2 << std::endl;
}
void sub(int n1, int n2) {
std::cout << "n1 = " << n1 << ", n2 = " << n2 << std::endl;
std::cout << "sub = " << n1 - n2 << std::endl;
}
int main() {
auto f1 = std::bind(add, 100, std::placeholders::_1);
f1(5); // add(100, 5) 형식으로 호출됩니다.
auto f2 = std::bind(sub, std::placeholders::_1, std::placeholders::_2);
f2(10, 7); // sub(10, 7) 형식으로 호출됩니다.
return 0;
}
참조
https://en.cppreference.com/w/cpp/utility/functional/bind
std::bind - cppreference.com
(1) template< class F, class... Args > /*unspecified*/ bind( F&& f, Args&&... args ); (since C++11) (until C++20) template< class F, class... Args > constexpr /*unspecified*/ bind( F&& f, Args&&... args ); (since C++20) (2) template< class R, class F, clas
en.cppreference.com
https://en.cppreference.com/w/cpp/utility/functional/placeholders
std::placeholders::_1, std::placeholders::_2, ..., std::placeholders::_N - cppreference.com
/*see below*/ _1; /*see below*/ _2; . . /*see below*/ _N; The std::placeholders namespace contains the placeholder objects [_1, ..., _N] where N is an implementation defined maximum number. When used as an argument in a std::bind expression, the placeholde
en.cppreference.com
'프로그래밍 > c++' 카테고리의 다른 글
| [C++11] shared_ptr 정리 및 간단한 사용 예제 (0) | 2023.04.23 |
|---|---|
| [C++11] std::thread, join() 간단한 사용법 (함수, 클래스) (0) | 2022.03.12 |